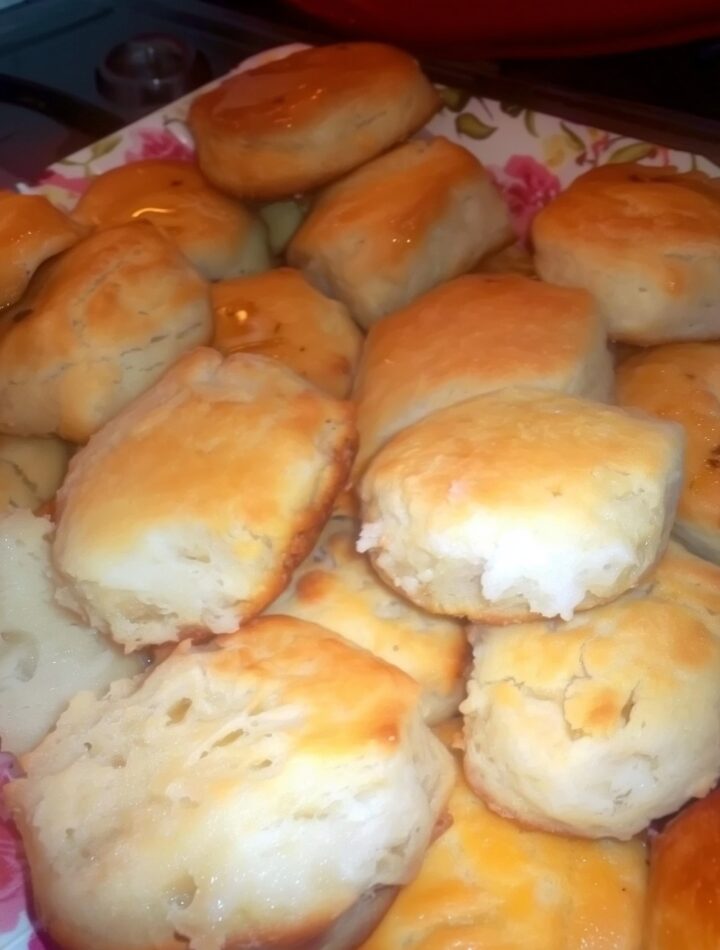
There’s nothing quite like the aroma of freshly baked buttermilk biscuits coming out of the oven. Soft on the inside, lightly crisp on the outside, and brushed with melted butter, these classic biscuits are a cornerstone of comfort food. Whether served for breakfast, alongside dinner, or as a base for hearty dishes, they remain one of the most searched and loved recipes under easy homemade bread, quick biscuit recipes, and Southern baking classics.
This recipe delivers light, fluffy biscuits with minimal ingredients and maximum flavor. Using traditional techniques and simple pantry staples, you can create bakery-quality biscuits in under 30 minutes.
The Secret Behind Perfect Biscuits: Simplicity Meets Technique
Biscuits are deceptively simple. With just a handful of ingredients—flour, fat, and liquid—you can create something extraordinary. However, the difference between dense biscuits and airy, tender ones lies entirely in technique.
This recipe focuses on:
- Keeping ingredients cold
- Handling the dough gently
- Baking at high heat
These steps ensure the biscuits rise beautifully and develop a soft, layered texture.
Understanding the Core Ingredients
🌾 Self-Rising Flour – The Foundation
Self-rising flour already contains:
- Baking powder (leavening agent)
- Salt
This simplifies the process and ensures consistent results. It’s the backbone of quick and easy biscuit recipes.
🧈 Cold Fat (Lard or Shortening) – The Key to Flakiness
Using very cold fat is essential because:
- It creates small pockets in the dough
- These pockets melt during baking
- Steam forms, creating layers
This is what gives biscuits their signature fluffy and tender texture.
🥛 Buttermilk – The Flavor Booster
Buttermilk adds:
- Tangy flavor
- Moisture
- Tender crumb
Its acidity also reacts with the leavening agents to help biscuits rise.
✨ Melted Butter Finish
Brushing biscuits with melted butter:
- Enhances flavor
- Adds a glossy finish
- Keeps tops soft
Why Temperature Matters So Much
One of the most important factors in biscuit success is temperature control.
Cold Ingredients = Better Texture
Cold fat stays solid until baking begins, which:
- Creates steam pockets
- Produces light, airy biscuits
If the fat melts too early, the biscuits become dense.
Hot Oven = Maximum Rise
A high oven temperature (450°F / 230°C):
- Activates leavening quickly
- Creates rapid steam
- Helps biscuits rise tall
The Art of Mixing Dough
Cutting the Fat into Flour
This step determines the final texture. The goal is to create a mixture that looks like:
- Coarse crumbs
- Small pea-sized bits of fat
These bits are what form flaky layers during baking.
Adding Buttermilk
When you pour in the buttermilk:
- Stir gently
- Stop as soon as the dough comes together
Overmixing leads to tough biscuits.
Kneading: Less Is More
Unlike bread, biscuit dough should not be heavily kneaded.
Why Gentle Handling Matters
- Overworking develops gluten
- Too much gluten = tough texture
A light knead (6–8 folds) is enough to:
- Bring the dough together
- Create structure
Shaping & Cutting: Small Details, Big Impact
Thickness Matters
Rolling dough to about ½–¾ inch thickness ensures:
- Even baking
- Proper rise
Cut Straight Down (No Twisting!)
Twisting the cutter seals the edges, which:
- Prevents proper rising
Always press straight down for best results.
Baking Techniques for Perfect Results
Spacing on the Baking Sheet
- Place biscuits close together → softer sides
- Space them apart → crisp edges
Choose based on your preference.
Watch for Visual Cues
Biscuits are ready when:
- Tops are golden brown
- Sides are puffed
- Bottoms are lightly crisp
Flavor Variations & Add-Ons
While this recipe keeps ingredients classic, you can enhance flavor by adding:
- Fresh herbs like parsley or thyme
- A sprinkle of black pepper
- A touch of garlic powder
These additions maintain authenticity while offering subtle upgrades.
Serving Ideas for Every Meal
Breakfast Favorites
- With butter and jam
- Honey drizzle
- Eggs and sausage
Lunch or Dinner Pairings
- Alongside soups and stews
- With fried chicken
- As a base for sandwiches
Dessert Twist
- Serve with whipped cream and fruit
- Add a touch of sugar for sweetness
Common Mistakes to Avoid
❌ Using warm ingredients
✔️ Always keep fat and buttermilk cold
❌ Overmixing dough
✔️ Mix just until combined
❌ Twisting the cutter
✔️ Press straight down
❌ Overbaking
✔️ Remove when golden
Storage & Reheating Tips
- Store in airtight container for up to 2 days
- Reheat in oven for best texture
- Freeze baked biscuits for longer storage
Why This Recipe Ranks High on Google Searches
This recipe targets popular keywords such as:
- Easy homemade biscuits
- Fluffy buttermilk biscuits recipe
- Quick Southern biscuit recipe
- Best biscuit recipe from scratch
It’s popular because it’s:
- Simple
- Fast
- Reliable
- Delicious
Final Thoughts: Mastering the Perfect Biscuit
Making homemade biscuits is a skill that becomes easier with practice. Once you understand the importance of cold ingredients, gentle mixing, and proper baking, you can consistently create biscuits that are:
- Light and fluffy
- Buttery and rich
- Perfectly golden
This recipe is a classic foundation that you can return to again and again.
PART 2: Simple Buttermilk Biscuit Recipe
Ingredients
- 2 cups self-rising flour
- ¼ cup very cold lard or shortening
- 1 cup very cold buttermilk (plus extra if needed)
- 3 tablespoons melted butter or shortening (for brushing)
Instructions
- Preheat Oven
Set oven to 450°F (230°C). Grease or line a baking sheet. - Mix Flour & Fat
Add flour to a bowl. Cut in cold fat until crumbly. - Add Buttermilk
Pour in buttermilk and stir gently until dough forms. - Knead Lightly
Turn onto floured surface and knead 6–8 times. - Shape & Cut
Roll to ½–¾ inch thick. Cut biscuits without twisting. - Bake
Place on baking sheet and bake 12–15 minutes until golden. - Finish
Brush with melted butter immediately after baking.